This post teaches you how to remove Adobe Updater from Windows 10 systems. Adobe Updater upgrades your Adobe applications in the background, and it can make you use more data and PC resources than expected.
If you don’t want these unwanted background processes, you may consider using Adobe alternatives. Learn how to remove Adobe Updater Windows 10 here, as we explore the best ways to do this without running into further complications.
How do I remove Adobe Updater in Windows 10?
This section shows you the best ways to get rid of this annoying background process from your computer.
Part 1: Disable Adobe Acrobat Update Task
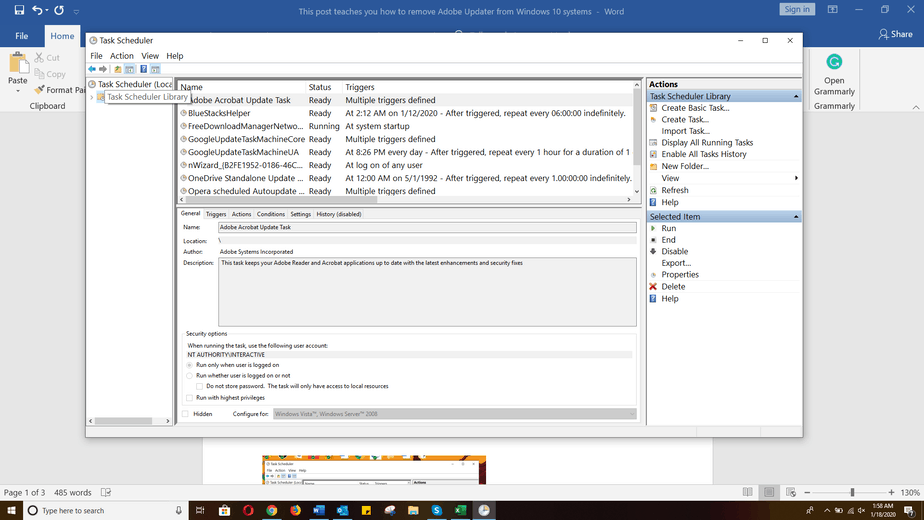
To remove this utility, we, first of all, disable “Adobe Acrobat Update Task” from Task Scheduler. However, before you do anything, please close all Adobe applications. Here is how to do it:
- Press the Windows key to search for a program. After that, begin to type “task scheduler” and click “Task Scheduler” when it is suggested.

- In Task Scheduler, click the “Task Schedule Library” on the left.

- Next, find and right-click the “Adobe Acrobat Update Task.” From the right-click options, hit “Disable.”

- Finally, close Task Scheduler” and continue to Part 2 of this guide, where we finally remove Adobe Updater.
Part 2: Remove Adobe Updater
Adobe Updater can either be removed from Windows Services or the Registry Editor. We’ll start with the technique of removing Adobe Updater through Services.
Method 1: How to remove Adobe Updater through Services
- Initialize the “run” command box by pressing “Windows” + “R” and enter “services” and hit “Enter.”
- Find the “Adobe Acrobat Update Service,” right-click on it, and hit “Properties.”


- In the “Properties” box is an option to set the “Startup type.” Choose “Disabled” from the dropdown.


- Finally, “Apply” the settings to save them and click “OK” to exit the Window.


Method 2: How to remove Adobe Updater using the Registry
Before proceeding with this solution, you may need to back up your Windows Registry first. This way, if something goes wrong, you can restore the backup and not lose data.
- Press the “Windows” key + “R” to open the “run” dialog box, type “Regedit,” and hit “Enter.”


- You will find yourself now in the Registry Editor. Now, notice the locations on the left pane? Now, navigate to the following location:
HKEY_LOCAL_MACHINE\SOFTWARE\Wow6432Node\Adobe\Adobe ARM\Legacy\(product name)\(product code)


- Double-click on the “Mode” under the “Name” column and then change the “Value Data” from 3 to 0.


- Finally, exit Registry Editor and restart the machine for the changes to be confirmed.
On completing the steps above, you will now have an Adobe Updater-free Windows 10 PC.
Conclusion
Not all background processes are harmful, but you may have to disable them from time to time. For example, you deactivate your antivirus software when you troubleshoot a lot of Windows connectivity issues.
If you have read to this point, then it’s safe to say that you now know how to remove Adobe Updater from your Windows 10 machine.


